
You scrub the tiles. You spray the glass. And yet, every time you step back and look at the shower, those dark grout lines drag the whole thing down. Sound familiar?
Dirty shower grout is one of the most common — and most frustrating — bathroom problems homeowners deal with. Grout is porous by nature, which means soap scum, hard water minerals, mold spores, and body oils all seep in over time. Regular wiping doesn’t cut it. You need the right method, matched to the right type of stain.
This guide covers exactly how to clean shower grout from top to bottom: which cleaning solutions actually work, how to tackle mold without damaging tile, when to seal, and what mistakes cause grout to go dark again within weeks.
Why Shower Grout Gets So Dirty (And Why It’s Hard to Keep Clean)
Grout is a cement-based material filled between tiles to create a watertight seal. The problem is that cement is inherently porous — it has microscopic channels that absorb moisture, minerals, and organic matter like a sponge.
In a shower environment, grout faces a perfect storm of staining agents:
- Hard water deposits leave white or chalky residue as water evaporates
- Soap scum — a mix of soap and calcium — clings to grout pores
- Body oils and dead skin cells feed mold and mildew growth
- Mold spores thrive in warm, humid spaces with poor ventilation
- Iron in water causes orange or rust-colored staining
Grout lines also sit slightly recessed below the tile surface, which means mops and sponges glide right over them without making real contact. Without targeted scrubbing, the grime simply builds up.
Understanding this helps you choose the right cleaning approach — and explains why surface-level wiping never seems to work.
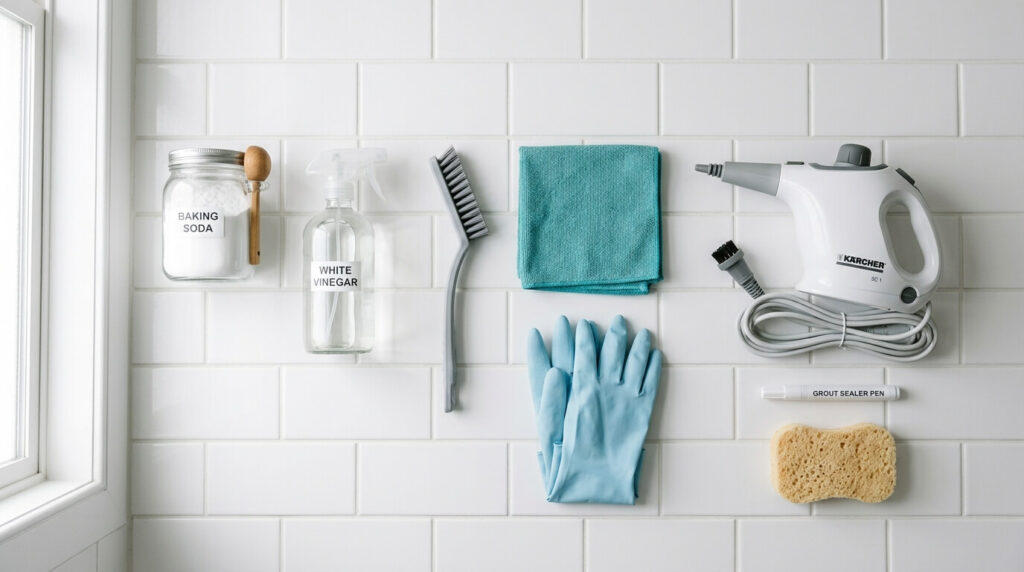
What You’ll Need Before You Start
Gather your supplies before touching anything. Having everything ready prevents you from letting a cleaning solution sit too long on tiles — which can cause damage, especially on natural stone.
- Stiff-bristle grout brush (an old toothbrush works for corners)
- Spray bottle
- Microfiber cloths or clean rags
- Bucket of warm water
- Safety gloves and eye protection (especially for bleach-based methods)
- Good ventilation — open the window or run the exhaust fan
You’ll also choose a cleaning solution based on your stain type. More on that below.
How to Clean Shower Grout: 5 Methods That Actually Work
Not all grout stains respond to the same treatment. Below are five proven approaches, from gentlest to strongest. Always start with the mildest option and escalate only if needed — aggressive cleaners can erode grout over time.
| Method | Best For | Grout-Safe? | Effort Level |
| Baking Soda + Vinegar | Soap scum, light stains | Yes | Low |
| Hydrogen Peroxide Paste | Yellowing, moderate stains | Yes | Low–Medium |
| Oxygen Bleach (OxiClean) | Deep stains, mold | Yes (diluted) | Medium |
| Chlorine Bleach | Black mold, severe stains | Use cautiously | Medium |
| Steam Cleaning | All stain types, no chemicals | Yes | Low (machine req.) |
Method 1: Baking Soda and White Vinegar (Best for Light Buildup)
This is the classic starting point — cheap, non-toxic, and surprisingly effective on soap scum and mild staining.
- Sprinkle baking soda generously along the grout lines.
- Fill a spray bottle with undiluted white vinegar and spray directly onto the baking soda. It will fizz — that’s normal and helpful.
- Let the fizzing reaction work for 5–10 minutes.
- Scrub with a stiff grout brush using back-and-forth strokes.
- Rinse with warm water and wipe dry with a microfiber cloth.
Pro tip: Don’t use vinegar on natural stone tiles like marble or travertine. The acid can etch the surface and cause permanent damage. Stick to baking soda paste with warm water instead.
Method 2: Hydrogen Peroxide Paste (Best for Yellow or Discolored Grout)
Hydrogen peroxide is a mild bleaching agent that lifts discoloration without the harshness of chlorine bleach. It’s especially good for white or light-colored grout that’s turned yellow or gray over time.
- Mix 3% hydrogen peroxide (standard drugstore variety) with baking soda to form a thick paste.
- Apply the paste directly to grout lines and let it sit for 15–20 minutes.
- Scrub firmly with a grout brush.
- Rinse thoroughly with warm water.

This method is safe for most tile types and can be repeated weekly without damaging grout. It’s a great maintenance option for between deep cleans.
Method 3: Oxygen Bleach Solution (Best for Deep Stains and Mold)
Oxygen bleach — sold as OxiClean or similar powder formulas — releases oxygen bubbles that break down organic stains like mold, mildew, and body oil. It’s significantly gentler on grout than chlorine bleach while being more effective than vinegar for tough stains.
- Mix 2 tablespoons of oxygen bleach powder into 2 cups of warm water. Stir until dissolved.
- Apply to grout with a brush or pour into the lines directly.
- Let it sit for 15–30 minutes (longer for heavy mold).
- Scrub with a stiff brush, then rinse thoroughly.
One thing competitors rarely mention: oxygen bleach keeps working while wet, so don’t rush the dwell time. The longer it sits (up to 30 minutes), the more stain-breaking action you get.
Method 4: Chlorine Bleach (For Severe Mold — Use With Caution)
Chlorine bleach is the heavy artillery. It’s effective against black mold and deeply embedded stains, but it needs to be handled carefully and used sparingly — repeated use can degrade grout and cause it to crumble over time.
- Dilute bleach with water (1 part bleach to 10 parts water) in a spray bottle.
- Apply to affected grout lines only. Never use on colored grout — it will strip the pigment.
- Wait 5–10 minutes (never leave bleach on longer — it can corrode grout).
- Scrub with a brush, then rinse extremely well.
- Ventilate the space thoroughly during and after use.
Never mix bleach with ammonia, vinegar, or any other cleaning product. The combination produces toxic fumes. If you’re unsure whether a product contains ammonia, check the label before combining.
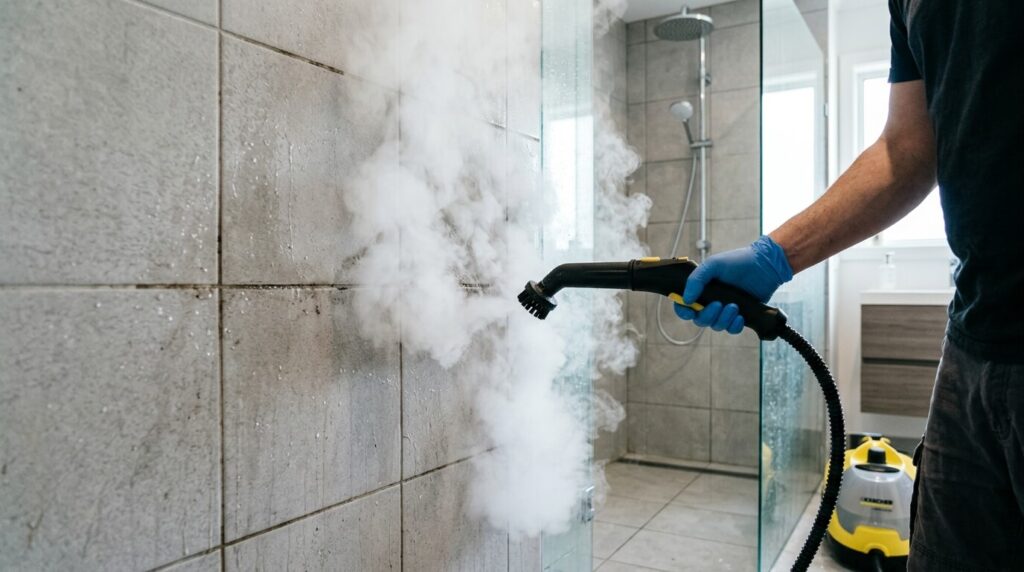
Method 5: Steam Cleaning (Best Chemical-Free Method)
Steam cleaners are the secret weapon most homeowners overlook. High-temperature steam (usually 212–300°F) penetrates grout pores, killing mold and bacteria while loosening buildup — no scrubbing required for most stains.
Here’s how to use one effectively:
- Fill the steam cleaner with distilled water (reduces mineral deposits in the machine).
- Attach the narrow nozzle or grout-specific attachment.
- Hold the nozzle directly over the grout line and move slowly — about 1 inch per second.
- Wipe loosened residue immediately with a clean microfiber cloth.
Steam cleaning works on all tile types including natural stone and is safe for colored grout. It’s the best option for people with sensitivities to chemical cleaners. The investment in a handheld steam cleaner (typically $40–$120) pays off quickly.
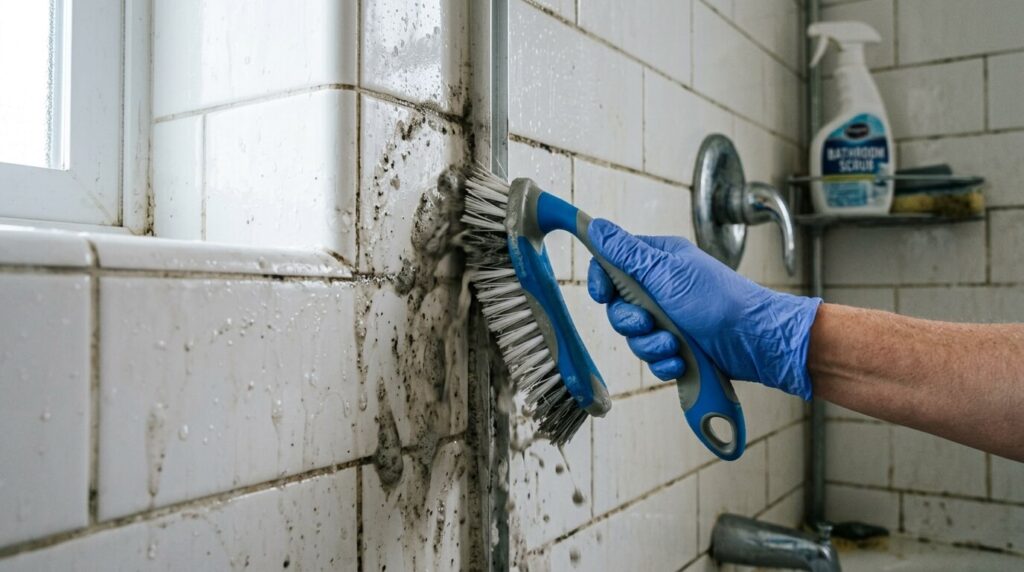
How to Remove Mold and Mildew from Shower Grout
Black or green mold on grout is more than a cosmetic issue — it signals moisture penetration and can affect air quality if left unchecked. Catching it early makes treatment much simpler.
For surface-level mold (no visible depth or spreading):
- Hydrogen peroxide paste or oxygen bleach solution will usually handle it
- Scrub thoroughly, rinse, and dry completely
- Improve ventilation to prevent return
For established or recurring mold:
- Use diluted chlorine bleach or a dedicated mold remover spray
- Apply, wait, scrub, rinse — then seal the grout after it’s fully dry
- If mold returns within weeks despite cleaning, the grout may need replacement
Cleaning Methods by Grout Type
Not all grout is created equal, and the wrong cleaner on the wrong type can cause real damage.
| Grout Type | Characteristics | Safe Cleaners | Avoid |
| Cement-based (most common) | Porous, absorbent | All methods above | Long bleach dwell times |
| Epoxy grout | Non-porous, stain-resistant | Mild soap + warm water | Abrasive scrubbers |
| Urethane grout | Flexible, crack-resistant | Neutral pH cleaners | Acidic/alkaline cleaners |
| Colored grout | Pigmented cement base | Baking soda, steam, oxygen bleach | Chlorine bleach |
If you’re not sure what type of grout you have, test any cleaner on a small, hidden section first and wait 10 minutes before applying broadly.
5 Common Mistakes That Make Grout Dirty Faster
Even with the best intentions, small habits can undo a deep clean within days. Here’s what to avoid:
- Skipping the rinse — leaving cleaning product residue in grout lines attracts more dirt and soap
- Using a flat mop or sponge — these can’t reach recessed grout; you need a brush
- Not drying after every shower — moisture is the primary cause of mold; squeegee and ventilate
- Sealing dirty grout — sealer traps stains permanently; always clean before sealing
- Over-using bleach — it weakens the grout binder over time, causing crumbling
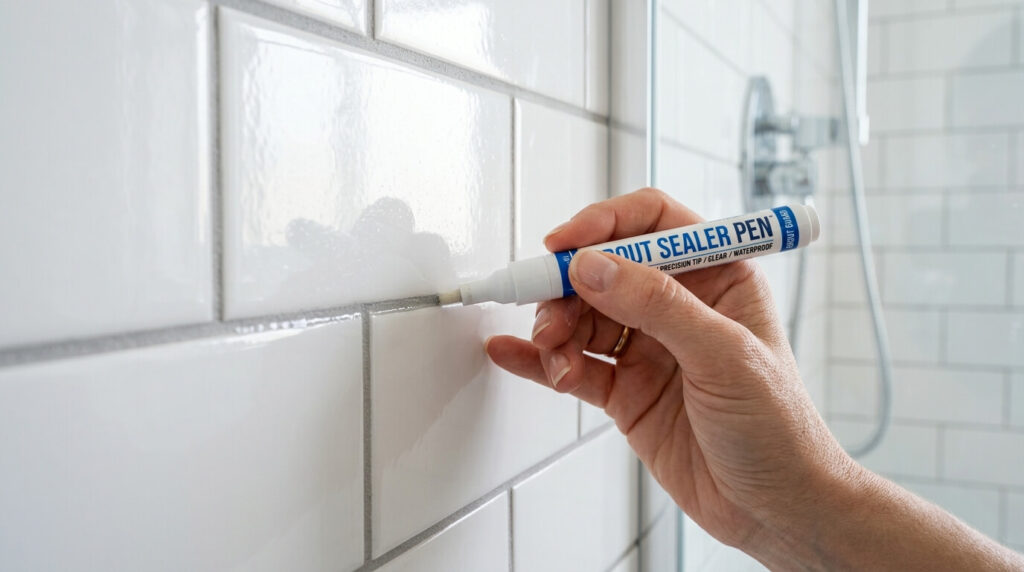
How to Seal Shower Grout After Cleaning
Sealing is the most overlooked step in grout maintenance — and it’s the one that makes the biggest difference long-term. A quality grout sealer fills those microscopic pores, creating a barrier against water, mold, and staining agents.
When to Seal
- New grout: wait at least 72 hours after installation
- Existing grout: after any deep clean, once fully dry (24–48 hours)
- Frequency: every 6–12 months in high-traffic showers

How to Apply Grout Sealer
- Make sure grout is completely clean and bone dry — any moisture will prevent adhesion.
- Apply sealer with a small brush, foam applicator, or sealer pen directly onto grout lines.
- Wipe any sealer off tile surfaces immediately with a damp cloth.
- Apply a second coat after 10 minutes for added protection.
- Avoid water contact for at least 24 hours.
A penetrating (impregnating) sealer is generally better than a surface sealer for shower environments — it soaks into the grout rather than forming a film that can peel.
Weekly Maintenance Routine to Keep Grout Clean Longer
Deep cleaning is necessary, but a consistent maintenance routine means you’ll do it far less often. This takes under five minutes after each shower:
- Squeegee tile walls after every shower to remove water and soap residue.
- Spray diluted white vinegar (50/50 with water) on grout lines 2–3 times per week and let it air dry.
- Run the bathroom exhaust fan for at least 15 minutes after showering.
- Do a light scrub with a soft brush and dish soap once a week.
One genuinely helpful tip most articles skip: switch from bar soap to liquid body wash. Bar soap contains talc and fatty acids that create the soap scum that stains grout. Liquid wash doesn’t leave the same residue.
When Cleaning Isn’t Enough: Signs You Need to Re-Grout
Sometimes grout is beyond saving. Here’s what to watch for:
- Crumbling or missing sections of grout — this exposes tile backing to water
- Mold that returns within days of cleaning — indicates deep penetration
- Grout that’s permanently stained after multiple attempts
- Tiles that shift or feel loose — often a sign of failed grout or substrate damage
Re-grouting a shower is a weekend DIY project if you’re comfortable with basic tools. Grout removal tools (oscillating tools with grout blades) cost around $30–$60. For larger showers or complex tile patterns, a professional tile contractor is worth the cost.
Conclusion
Knowing how to clean shower grout properly comes down to matching the right method to the right problem. Light soap scum responds beautifully to baking soda and vinegar. Stubborn mold needs oxygen bleach or a careful application of diluted chlorine bleach. And no cleaning method lasts without sealing and a basic weekly maintenance habit.
Start with the gentlest approach, work up if needed, and don’t skip the seal. Your grout will stay cleaner longer — and you’ll spend a lot less time scrubbing.
Frequently Asked Questions
What is the best homemade cleaner for shower grout?
A paste of baking soda and hydrogen peroxide is the best all-around homemade cleaner. Apply it to grout lines, let it sit for 15–20 minutes, scrub with a stiff brush, and rinse. It’s safe for most grout types and effective on yellowing and mild mold.
How do I clean black mold from shower grout?
For black mold, apply diluted chlorine bleach (1 part bleach to 10 parts water) directly to the affected grout, wait 5–10 minutes, scrub, and rinse thoroughly. For a chemical-free option, steam cleaning at high temperature also kills mold spores. After treatment, seal the grout to prevent recurrence.
How often should I clean shower grout?
Do a light scrub weekly as part of your bathroom maintenance routine. Perform a deep clean with a stronger solution every 1–3 months, depending on shower usage. Reseal grout every 6–12 months.
Can I use bleach on colored grout?
No. Chlorine bleach will strip the pigment from colored grout, leaving it faded or blotchy. Use oxygen bleach, hydrogen peroxide paste, or steam cleaning instead — these are effective without bleaching the color.
Does vinegar damage shower grout?
Vinegar is acidic and can weaken cement-based grout with repeated use over time. It’s fine for occasional light cleaning, but shouldn’t be your daily go-to. Never use vinegar on grout surrounding natural stone tiles like marble or limestone — it will etch the stone surface.
How long after cleaning should I wait before sealing grout?
Grout must be completely dry before sealing — typically 24 to 48 hours after cleaning. Any residual moisture trapped under the sealer will prevent proper adhesion and can promote mold growth beneath the surface.
What tools work best for scrubbing shower grout?
A dedicated grout brush with stiff nylon bristles is the most effective tool. An old electric toothbrush works well in tight corners and around fixtures. For larger areas, a drill-mounted brush attachment speeds up the process significantly. Avoid metal brushes — they can scratch tile glazing and damage grout.