
If you’ve ever noticed water damage creeping up the wall behind your bathtub — or spotted that telltale dark ring of mold spreading through crumbling grout — you already understand why a tub surround matters. It’s not just a cosmetic upgrade. It’s the protective layer standing between your tub area and thousands of dollars in water damage repair.
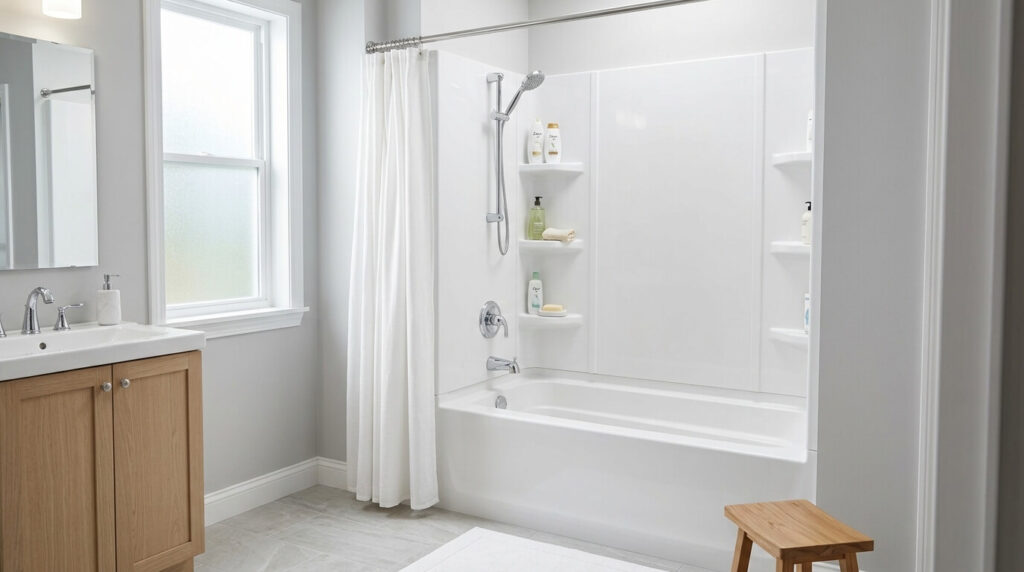
A tub surround is a waterproof panel system that covers the three walls enclosing an alcove bathtub. It shields drywall and framing from moisture, steam, and splash — while also giving your bathroom a clean, finished look. Whether you’re doing a full bathroom renovation or just freshening up a tired space, choosing the right tub surround is one of the highest-impact decisions you can make.
This guide covers everything: what a tub surround actually is, the best materials available in 2025, honest cost breakdowns, how to install one step by step, and the mistakes most homeowners make that cause expensive problems later.
What Is a Tub Surround, Exactly?
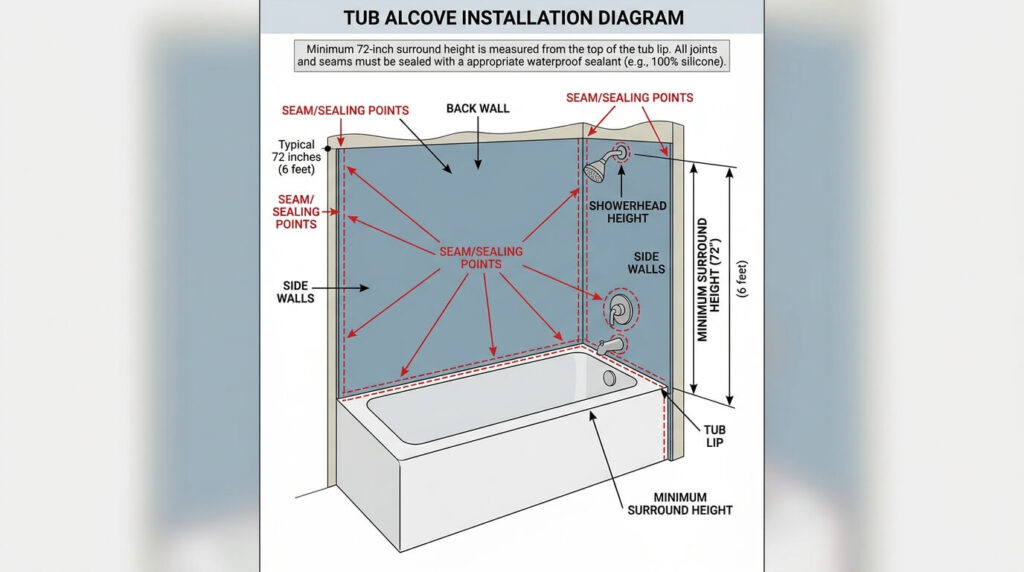
A tub surround is a fitted wall covering system that wraps around the three exposed walls of an alcove bathtub — the back wall and the two side walls. It typically extends from the top edge of the tub to at least 72 inches high, creating a continuous, waterproof surface that protects the underlying wall structure from constant water exposure.
Think of it as armor for your walls. Every time someone takes a bath or shower, water splashes, steam condenses, and humidity seeps. Without a proper surround, that moisture works its way into drywall, wood framing, and insulation — causing rot, mold, and structural damage that can be both dangerous and extremely costly to repair.
Tub surrounds are different from full tub or shower enclosures (which include doors or curtain rods). The surround refers specifically to the wall panels — the enclosure hardware is a separate component.
Key functions of a tub surround:
- Creates a continuous waterproof barrier around the tub area
- Prevents mold, mildew, and rot in wall cavities
- Covers imperfect or damaged existing walls
- Improves the aesthetic of the bathroom without a full remodel
- Reduces ongoing maintenance compared to grouted tile
Types of Tub Surrounds: Which Configuration Is Right for You?
Before choosing a material, it helps to understand how tub surrounds are physically configured. The format you choose affects installation difficulty, seam sealing requirements, and how watertight the final result will be.
Single-Piece Surrounds
A one-piece surround is molded as a single unit that covers all three walls in one seamless piece. Because there are no seams, there’s nowhere for water to sneak through — making it the most watertight option available.
The downside is practical: getting a single-piece unit through narrow hallways, doorways, and stairwells can be nearly impossible in existing homes. These are best suited for new construction where the surround can be installed before walls are finished.
Three-Piece Surrounds (Most Popular)
The classic three-piece kit includes one back panel and two side panels. This is the most widely sold format because the separate panels are manageable enough to transport and maneuver through tight spaces, yet still leave only two corner seams that need to be properly sealed.
For most homeowners doing a bathroom refresh, a three-piece kit strikes the best balance between ease of installation and a clean finished look.
Five-Piece Surrounds
Five-piece kits break the panels into smaller sections, sometimes adding separate pieces for corners or upper sections. They’re the easiest to transport but require more seams — which means more sealing points and a higher risk of water infiltration if not done correctly.
Custom Tile Surrounds
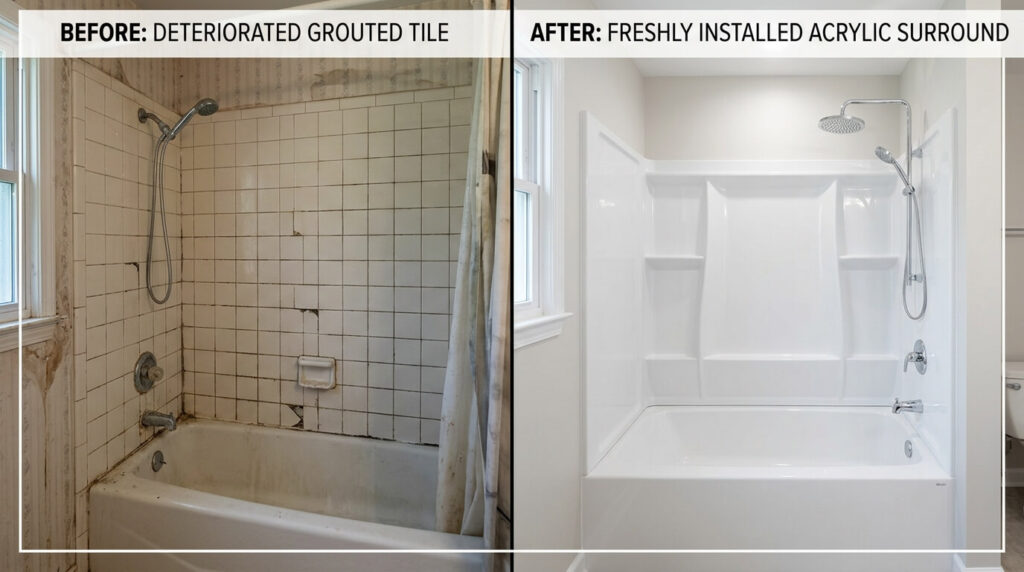
Tile isn’t a “kit” in the traditional sense, but it functions as a custom tub surround when applied to the three walls of a tub alcove. Ceramic, porcelain, and natural stone tiles offer the greatest design flexibility and the most upscale appearance. The trade-off is grout — which requires regular cleaning, periodic resealing, and is vulnerable to mold if neglected.
Tub Surround Materials: The Complete Comparison
Choosing the wrong material is the most common and expensive mistake homeowners make. Here’s an honest look at every mainstream option.
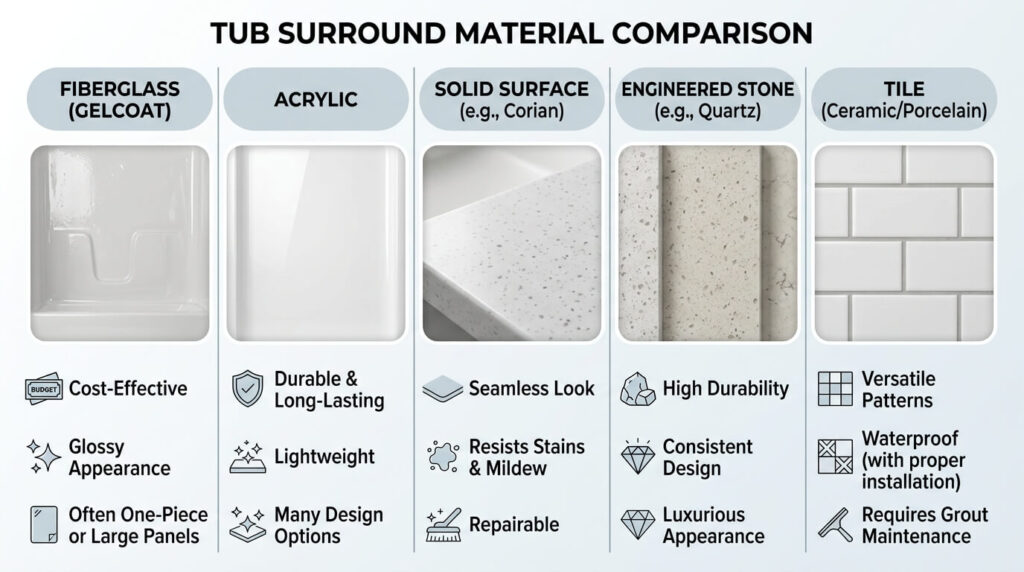
Fiberglass
Fiberglass surrounds are made from reinforced plastic molded into panels or a single sheet. They’re lightweight, easy to handle, and among the most affordable options on the market — typically ranging from $130 to $600 for the materials alone.
Best for: Budget-conscious projects, rental properties, and homeowners comfortable with DIY installation.
The real downside: Fiberglass is the least durable option. The surface scratches relatively easily, can dull or discolor over time (especially if harsh cleaners are used), and lower-quality units may crack or flex. As one professional installer puts it plainly: “The cheap fiberglass is really low quality.” If you go this route, budget at least $300–$400 for a mid-grade unit, not the absolute cheapest option available.
Maintenance: Easy — wipe down with a soft cloth and mild bathroom cleaner. Avoid abrasive scrubbers.
Acrylic
Acrylic surrounds are similar in weight to fiberglass but made from a thicker, more rigid material with a non-porous surface that resists chipping, staining, and fading. The surface stays glossy longer, and many homeowners find it easier to keep clean over the years.
Material cost typically runs $600 to $800, with professional installation adding another $800 to $2,000 depending on your location and wall condition.
Best for: Family bathrooms with daily heavy use, homeowners who want a balance of affordability and durability.
One nuance worth knowing: Not all acrylic surrounds are created equal. Thickness matters. A thinner acrylic panel will flex noticeably when you press on it — a sign of lower quality. Before purchasing, press lightly on the panel surface. There should be minimal give.
Maintenance: Low — non-porous surface resists soap scum and mildew. Regular wiping is usually all that’s needed.
Solid Surface / Cultured Marble / Composite Stone
Solid surface surrounds are made from engineered materials — cultured marble, acrylic composites, or quartz blends — that are cast into seamless panels. They have a premium look that mimics natural stone without the weight or cost, and their non-porous surfaces make them exceptionally resistant to stains and mold.
Material costs range from $800 to $1,800, with professional installation typically adding $2,000 to $4,000. These surrounds often use a clip-and-screw installation method that requires precision to do correctly — making them less suitable for casual DIY.
Best for: Mid-to-high-end renovations where aesthetics and low maintenance are the priority.
What competitors miss: Solid surface panels expand and contract with temperature changes. If not properly acclimated before installation and sealed with the correct flexible sealant at seams and edges, they can warp or crack over time. Always let panels sit in the room for 24 hours before installation.
Engineered Stone
Engineered stone surrounds — made from materials similar to quartz countertops — represent the premium end of the prefabricated market. They’re exceptionally durable, beautiful, and long-lasting, but also heavy and difficult to handle during installation.
Material costs run $1,200 to $2,500+, with professional installation adding $3,000 to $5,000. Installation can be a two-day job given the panel weight and precision required.
Best for: Luxury bathroom renovations where durability and appearance are paramount and budget is not the primary concern.
Tile (Ceramic, Porcelain, Natural Stone)
Custom tile surrounds offer more design flexibility than any prefabricated option. With thousands of colors, textures, sizes, and patterns available, you can create something truly unique. Natural stone tiles — marble, travertine, slate — add genuine luxury.
The significant drawback is grout. Grout lines are porous and require regular cleaning, periodic resealing, and vigilance against mold. In a high-humidity bathroom without excellent ventilation, grouted tile surrounds demand consistent maintenance to stay looking good.
Material cost for tile varies enormously — basic ceramic can be very affordable, while natural stone or large-format porcelain tiles run significantly higher. Labor for professional tile installation adds another substantial cost layer.
What competitors miss: The substrate behind tile matters enormously. Standard drywall is not acceptable in tub surrounds. You need either cement board, moisture-resistant greenboard, or a membrane system like Schluter KERDI before tiling. Skipping this step is how water damage happens even behind tile.
Material Comparison Table
| Material | Material Cost | Pro Install | DIY Friendly | Durability | Maintenance |
|---|---|---|---|---|---|
| Fiberglass | $130–$600 | $800–$1,000 | ✅ Yes | ⭐⭐ | Low |
| Acrylic | $600–$800 | $800–$2,000 | ✅ Yes | ⭐⭐⭐ | Low |
| Solid Surface | $800–$1,800 | $2,000–$4,000 | ⚠️ Moderate | ⭐⭐⭐⭐ | Very Low |
| Engineered Stone | $1,200–$2,500+ | $3,000–$5,000 | ❌ Pro Recommended | ⭐⭐⭐⭐⭐ | Very Low |
| Tile (Ceramic/Porcelain) | Varies | Varies | ⚠️ Experienced Only | ⭐⭐⭐⭐ | Medium–High |
| Natural Stone | High | High | ❌ Pro Only | ⭐⭐⭐⭐⭐ | High |
How to Measure for a Tub Surround
Getting the measurements right before you buy is critical. Returning a large surround kit is a hassle, and buying the wrong size will delay your project significantly.
For prefabricated kits:
Common standard dimensions are designed to fit the most typical alcove tub size — 60 inches long by 30–32 inches wide. Before assuming your tub is standard, measure:
- The width of the back wall (tub edge to tub edge)
- The depth of each side wall (front of tub to the back wall)
- The height from the top lip of the tub to where you want the surround to end (minimum 72 inches; extending to the ceiling is possible but requires proper ventilation)
For tile surrounds:
Measure each of the three walls individually — back wall width × height, and both side walls (depth × height) × 2. Add the three areas together for total square footage. Always add 10–15% extra for cuts, waste, and broken tiles.
Important: Also measure your doorway and any hallways the panels need to pass through. A single-piece or large three-piece surround that won’t fit through the door is a common and frustrating mistake.
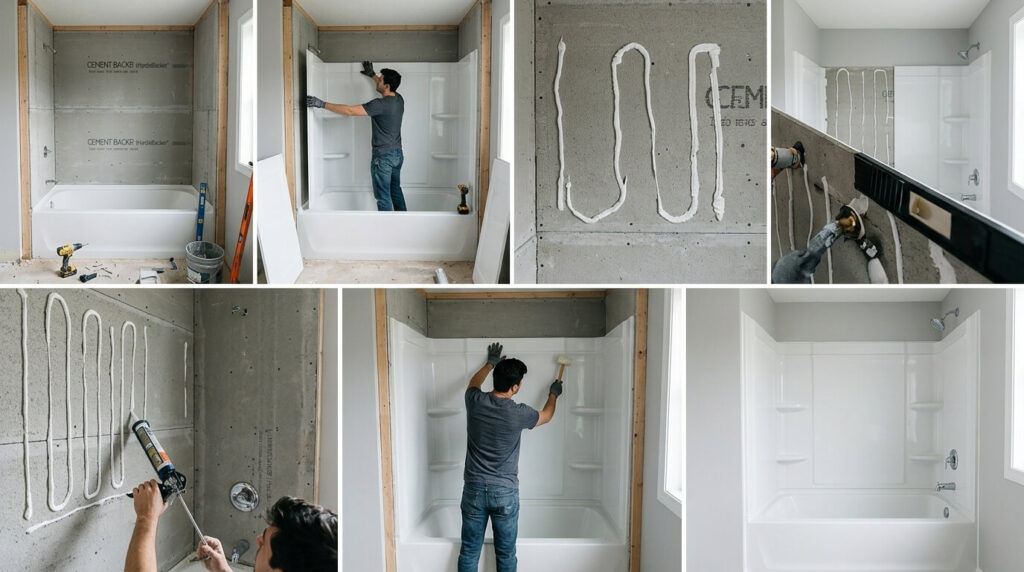
How to Install a Tub Surround: Step-by-Step
Fiberglass and acrylic three-piece kits are the most DIY-friendly options. Here’s how the process works.
Tools and materials you’ll need:
- Level and tape measure
- Pencil
- Fine-tooth saw or scoring tool (depending on panel material)
- Drill and hole saw (for plumbing cutouts)
- Panel adhesive rated for wet areas
- 100% silicone sealant (not acrylic caulk)
- Painter’s tape
- Sandpaper (for surface prep)
Step 1: Prepare the Walls
Remove the existing surround, tile, or wall material. Inspect the underlying structure for any water damage, rot, or mold. This is non-negotiable — installing a new surround over damaged walls simply traps the problem.
Install moisture-resistant backing — cement board or moisture-resistant drywall — if not already present. The surface must be flat, firm, and completely dry before panels go up.
Step 2: Dry-Fit the Panels
Before applying any adhesive, dry-fit all panels to confirm they fit correctly. Mark plumbing locations with a pencil, then use your hole saw to cut openings for the faucet and spout. Cut slowly and carefully — mistakes here are expensive.
Step 3: Apply Adhesive
Apply the panel adhesive in a serpentine pattern on the back of each panel, following the manufacturer’s instructions. Most kits specify leaving a gap around the edges to avoid squeeze-out into the silicone sealing zones.
Press each panel firmly against the wall, starting with the back panel. Use painter’s tape to hold panels in position while the adhesive sets. Many manufacturers recommend a 24-hour cure time before sealing.
Step 4: Seal Every Seam and Edge
This step makes or breaks the installation. Use 100% silicone sealant — not standard caulk — along every corner seam and along the joint where the panel meets the tub rim. Smooth with a wet finger or caulk tool. Do not skip any gap, no matter how small it looks.
The joint between the tub and the surround panel is the single most common water intrusion point. Make it generous and continuous.
Step 5: Cure and Test
Allow the silicone to cure fully per the manufacturer’s specification — typically 24 hours minimum. Then run water and check all seams and corners for any signs of leaking or lifting.
When to call a professional: Solid surface and engineered stone panels should always be professionally installed. Also hire a pro if your walls are significantly out of plumb, if there’s existing water damage requiring repair, or if you’re uncomfortable making precise cuts around plumbing.
Tub Surround vs. Tile: Which Should You Choose?
This is the question most homeowners wrestle with, and the honest answer depends on your priorities.
Choose a prefab tub surround if:
- You want faster installation (often one to two days vs. a week or more for tile)
- Low ongoing maintenance is a priority
- Your budget is $200–$1,800 for materials
- You want minimal grout cleaning
- You’re refreshing a bathroom without a full renovation
Choose tile if:
- Custom design is important to you
- You want the highest-end aesthetic for a luxury bathroom
- You have proper substrate installation (cement board/membrane)
- You’re prepared to maintain and reseal grout periodically
- You’re already doing a full bathroom renovation
5 Common Tub Surround Mistakes (And How to Avoid Them)
1. Installing over damaged walls. The single most expensive mistake. Always strip back to the framing if there’s any doubt about moisture damage.
2. Using the wrong sealant. Standard paintable caulk is not appropriate for tub surrounds. Use 100% silicone, which remains flexible and waterproof even as the tub flexes during use.
3. Skipping the backing board. Standard drywall is not a suitable substrate for most surround systems. Use cement board or moisture-resistant options unless your system specifically permits otherwise.
4. Buying a single-piece unit for an existing home. Single-piece surrounds almost never fit through standard doorways. Confirm transport feasibility before purchasing.
5. Letting panels acclimate. Solid surface and composite panels need time to adjust to room temperature before installation. Skipping this causes warping and poor adhesion.
How Long Does a Tub Surround Last?
A well-chosen and properly installed tub surround is a long-term investment:
- Fiberglass: 10–15 years with reasonable care
- Acrylic: 15–20 years or more
- Solid surface/composite: 20+ years
- Engineered stone: 25+ years
- Tile (with proper substrate): 20–30 years with proper grout maintenance
The biggest variable isn’t the material — it’s the quality of the installation, particularly the sealing. A perfect material installed with poor sealing will fail in a fraction of the time.
Tub Surround Cost Summary
Understanding the full cost picture — materials plus installation — helps you budget realistically.
| Scope | Estimated Total |
|---|---|
| DIY fiberglass kit | $130–$600 |
| DIY acrylic kit | $600–$800 |
| Pro-installed fiberglass | $930–$1,600 |
| Pro-installed acrylic | $1,400–$2,800 |
| Pro-installed solid surface | $2,800–$5,800 |
| Pro-installed engineered stone | $4,200–$7,500+ |
| Custom tile (professional) | $1,500–$8,000+ |
Costs vary by region. US markets tend to be 10–20% lower than comparable Canadian or UK pricing for similar materials. Australian pricing typically sits 15–25% higher due to import costs.
Conclusion
A tub surround is one of the smartest investments you can make in a bathroom — not just for the visual refresh, but for the long-term protection it provides to your walls, framing, and home’s structural integrity. The key is making the right choice upfront: matching the material to your budget, your maintenance tolerance, and your installation confidence level.
If budget is the primary concern and you’re comfortable with DIY, a mid-grade acrylic three-piece kit hits the sweet spot of affordability, durability, and clean looks. If you want something that will last decades and never think about grout again, solid surface or engineered stone panels are worth the investment. And if design customization matters most, tile done right — with proper substrate and professional installation — is genuinely beautiful.
Whatever route you choose, the most important thing is this: don’t cut corners on the sealing. A perfect tub surround installed with mediocre sealing will fail. A basic fiberglass kit installed with meticulous silicone work will protect your bathroom for years.
FAQ
Q: What is the difference between a tub surround and a tub enclosure?
A: A tub surround refers specifically to the wall panels that cover the three walls around an alcove bathtub. A tub enclosure typically includes the framing, doors, or curtain hardware that encloses the open side of the tub. They’re often purchased and installed separately.
Q: Can I install a tub surround over existing tile?
A: Technically yes, but it’s generally not recommended. Installing over tile adds thickness to the walls, which can create gaps around plumbing and trim. It also only works if the existing tile is completely flat, firmly adhered, and free of mold. In most cases, removing existing tile and starting fresh produces better results.
Q: What is the minimum height for a tub surround?
A: The minimum height is typically 72 inches, and the surround should extend at least 3 inches above the showerhead rough-in. Going all the way to the ceiling is possible but requires adequate bathroom ventilation to prevent moisture accumulation at the top.
Q: How do I clean a tub surround without scratching it?
A: For acrylic and fiberglass, use a soft cloth or non-abrasive sponge with a mild liquid bathroom cleaner. Avoid powdered cleansers, steel wool, or scrubbing pads — they scratch the surface and make it harder to clean over time. For solid surface, the same gentle approach applies.
Q: Is a tub surround better than tile?
A: Neither is universally better — they serve different needs. Prefabricated surrounds are faster to install, require less maintenance, and are more cost-effective upfront. Tile offers more design flexibility and a higher-end aesthetic but requires regular grout maintenance. Your choice depends on budget, desired look, and how much ongoing upkeep you’re comfortable with.
Q: How long does it take to install a tub surround?
A: A DIY three-piece acrylic or fiberglass kit can typically be installed in one to two days, including wall prep and adhesive cure time. Professional installation of the same kit often takes just a few hours of active work, with the 24-hour cure time still required. Tile installation takes significantly longer — typically five to seven days or more for a professional job.
Q: Do tub surrounds come in different sizes?
A: Most prefabricated kits are designed for the standard 60-inch alcove tub. Some manufacturers offer kits for 54-inch or other non-standard sizes. Always measure your tub and alcove before purchasing, as an ill-fitting surround is one of the most common and frustrating installation problems.
Q: Can a tub surround be installed over drywall?
A: Standard drywall is not a suitable substrate for most tub surround systems. Moisture-resistant drywall (greenboard) is acceptable for some applications, but cement board is the preferred backing for maximum moisture protection. Always check the manufacturer’s specific substrate requirements.