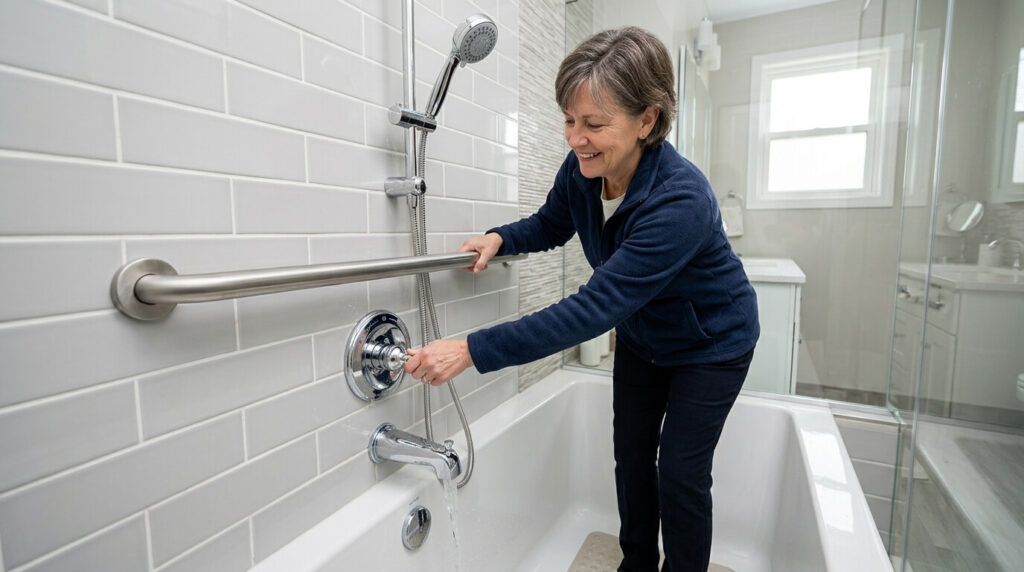
Learn the best tub grab bar placement for safety, comfort, and accessibility. Discover recommended grab bar heights, locations, and installation tips to help prevent slips and make bathtub entry and exit easier. A bathtub is the single most dangerous fixture in the average home. The combination of wet, soapy surfaces, a high step-over wall, and unstable footing makes tub entry and exit one of the leading causes of bathroom falls — and falls are the leading cause of injury for adults over 65. The fix is rarely expensive or complicated. It’s a properly placed grab bar, anchored in the right spot, at the right height, for the way a specific person actually moves through that space.
This guide goes beyond the generic “33 to 36 inches” advice you’ll find on most sites. It walks through exact placement for every tub configuration — walk-in, alcove, clawfoot, tub-shower combo — explains the difference between ADA benchmarks and what actually works for a home bathroom, and covers the structural side (stud framing, blocking, anchors) that most articles skip entirely. By the end, you’ll know not just where a grab bar should go, but why, and how to verify your bathroom can support one.
Why Tub Grab Bar Placement Matters More Than the Bar Itself
A grab bar is only as good as its placement. A high-quality, 300-pound-rated stainless steel bar mounted in the wrong spot — too high, too far from the entry point, or installed where a hand naturally never reaches — provides little more than a false sense of security. Worse, a bar that’s reached for during a slip and missed can actually contribute to a fall rather than prevent one.
Bathtubs account for a disproportionate share of home injury incidents because three risk factors stack on top of each other: a wet, often slick surface; a transfer movement (stepping over a tub wall, lowering to a seated position, or rising back up) that briefly removes a full base of support; and a hard, unforgiving landing surface if balance is lost. Grab bars address the middle factor directly — they give the body a fixed point of support during the exact moment balance is most likely to fail.
This is why placement is a biomechanics question as much as a construction question. Where does a person’s hand naturally land when they feel unsteady stepping over a tub wall? Where do they reach when shifting from standing to sitting on a transfer bench? Good placement anticipates those exact moments.
Who Needs Tub Grab Bars (And Why It’s Not Just Seniors)
Grab bars get marketed almost exclusively toward older adults, but the use case is broader:
- Older adults and seniors experiencing normal age-related changes in balance, joint mobility, and reaction time.
- People recovering from surgery — hip replacements, knee replacements, and back procedures all commonly include a temporary or permanent grab bar recommendation in discharge instructions.
- Individuals with chronic conditions affecting balance or strength, including arthritis, Parkinson’s disease, multiple sclerosis, and vertigo disorders.
- Pregnant individuals, whose shifting center of gravity changes how they move through a tight bathing space.
- Children and caregivers, where a lower-mounted bar helps a child climb in independently or gives a parent a stable point to hold while assisting a child.
- Anyone in a tub-shower combo, since stepping over a tub wall onto a wet surface is inherently riskier than stepping into a curbless shower, regardless of age or health status.
Recognizing this wider audience matters for placement decisions — a household with both a grandparent and a toddler may need bars positioned and sized differently than a single-occupant accessible bathroom.
ADA Standards vs. Residential Best Practice: What’s the Difference?
This is the single most misunderstood part of grab bar placement, and most competing guides blur it. The Americans with Disabilities Act (ADA) Standards for Accessible Design govern public and commercial bathrooms — hotels, hospitals, restaurants, office buildings. They are legally mandatory in those settings.
In a private home, ADA standards are not legally required. The 2010 ADA Standards explicitly exempt residential dwelling units from mandatory grab bar installation, provided the walls have blocking installed for future placement. That said, ADA measurements remain the most rigorously tested, ergonomically researched benchmark available, which is exactly why occupational therapists, aging-in-place specialists, and contractors use them as the default starting point for home installations — then adjust for the individual.
Core ADA Bathtub Grab Bar Specifications
| Element | ADA Standard | Notes |
|---|---|---|
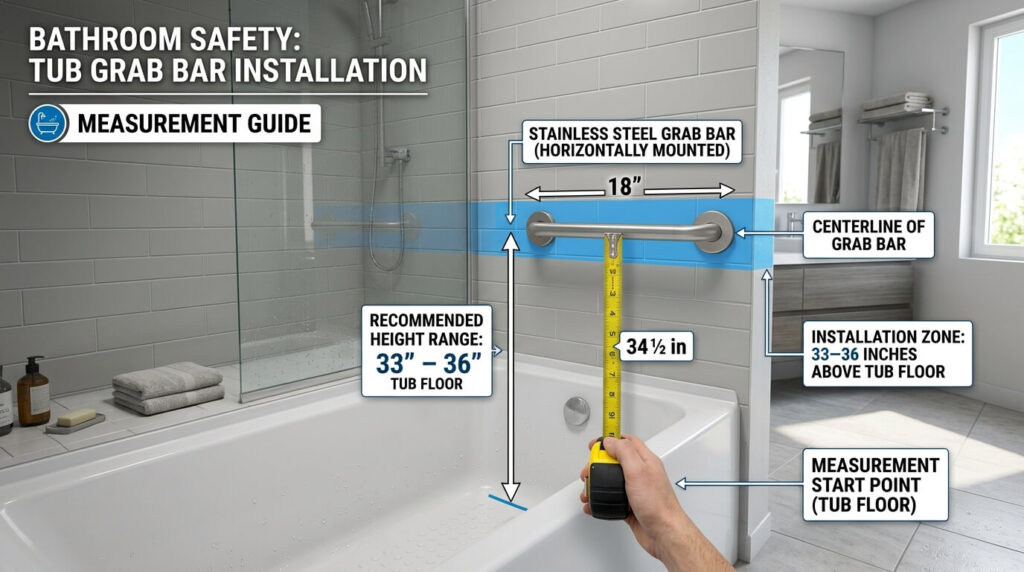
| Mounting height | 33–36 inches above the tub floor | Measured to the centerline of the gripping surface |
| Wall clearance | 1.5 inches between bar and wall | This is a fixed dimension, not a minimum — too much or too little creates an entrapment hazard |
| Bar diameter | 1.25–1.5 inches outer diameter | Sized for an average adult hand to encircle comfortably |
| Load capacity | 250 lbs minimum (tested at any point along the bar) | Many residential bars are now rated 300–500 lbs |
| Rear wall bar length (tubs with permanent seat) | 36 inches minimum | Positioned per the two-bar configuration below |
| Foot/head end wall bar | 24 inches minimum (tubs without seat) | Installed at the control end |
| Surface texture | Slip-resistant, no sharp edges | Rounded ends required |
| Mounting hardware | Corrosion-resistant | Stainless steel hardware is standard |
For a tub without a permanent seat — the most common residential configuration — ADA calls for two horizontal bars on the back (long) wall and one on the control-end wall, all within the 33–36 inch band. For a tub with a permanent or built-in seat, the configuration shifts: two bars on the back wall (one set lower, near the seat) and a vertical bar at the control end to assist standing transfers.
The practical takeaway for homeowners: treat 33–36 inches and the 1.5-inch wall clearance as fixed, non-negotiable baselines for adult installations. Treat the rest — exact bar count, length, and orientation — as adjustable based on the household’s actual needs.
Tub Grab Bar Placement by Zone: The Complete Breakdown
1. Entry and Exit Point (Vertical Bar)
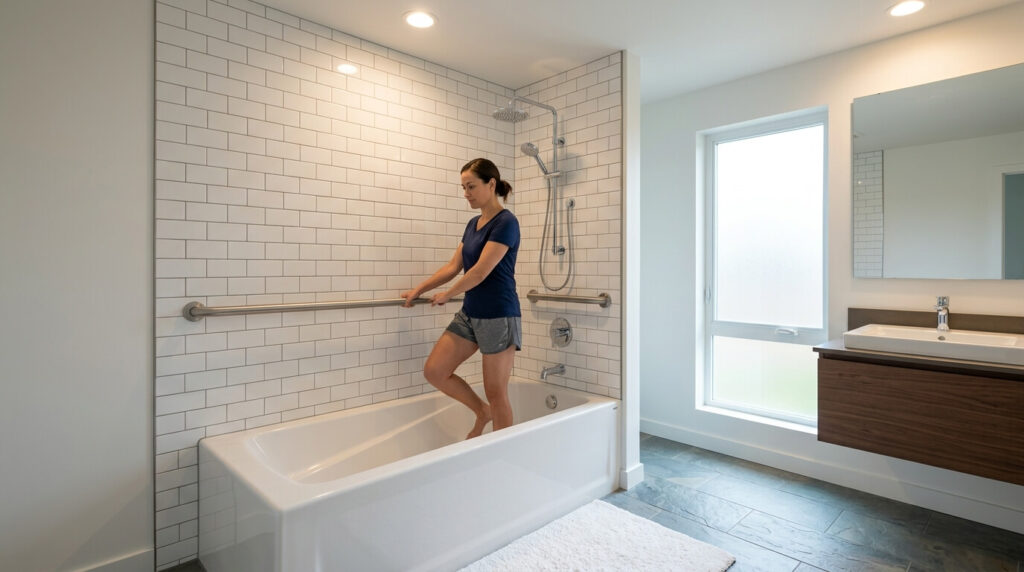
The entry/exit transition — stepping over the tub wall — is where the majority of tub-related falls occur, because it’s the only point in the routine where a person briefly balances on one leg while wet.
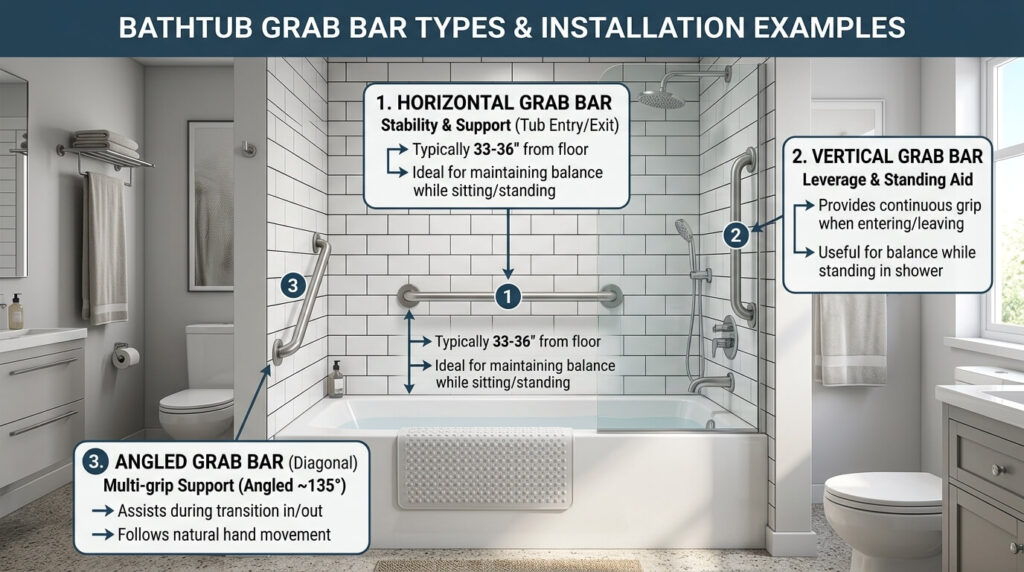
Placement: A vertical grab bar mounted on the wall nearest the tub’s entry edge, positioned so the bottom of the bar sits roughly at tub-wall height and the top extends to shoulder height for the primary user (typically 18–24 inches in length). The bar should be close enough to the entry point that a hand can find it without leaning or twisting — generally within arm’s reach of where the foot first crosses the tub wall.
Why vertical: A vertical orientation supports the pulling motion the body naturally uses to lift or lower itself during a step-over, which is mechanically different from the side-to-side stabilization a horizontal bar provides.
2. Along the Long Wall (Horizontal Bar)
Once inside the tub, a person needs continuous support while standing, turning, reaching for the faucet, or lowering into a seated bathing position.
Placement: A horizontal bar mounted along the longest wall of the tub, at 33–36 inches above the tub floor, ideally spanning at least 24 inches. For maximum coverage, this bar can run from near the entry point most of the length of the tub, giving the user a hand-over-hand path rather than a single fixed point.
Why horizontal: Horizontal bars are mechanically suited to lateral stabilization — they let a person shift weight side to side or maintain balance while standing in one spot, which is the dominant movement pattern while bathing.
3. Control/Faucet Wall
The wall holding the faucet and showerhead controls is a frequent reach point — and reaching across a wet tub to adjust water temperature is a common moment of imbalance, particularly for anyone leaning rather than standing centered.
Placement: A second horizontal or angled bar at the control end, also within the 33–36 inch band, positioned so the user can hold the bar with one hand while adjusting controls with the other.
4. Back Wall / Seated Transfer Zone
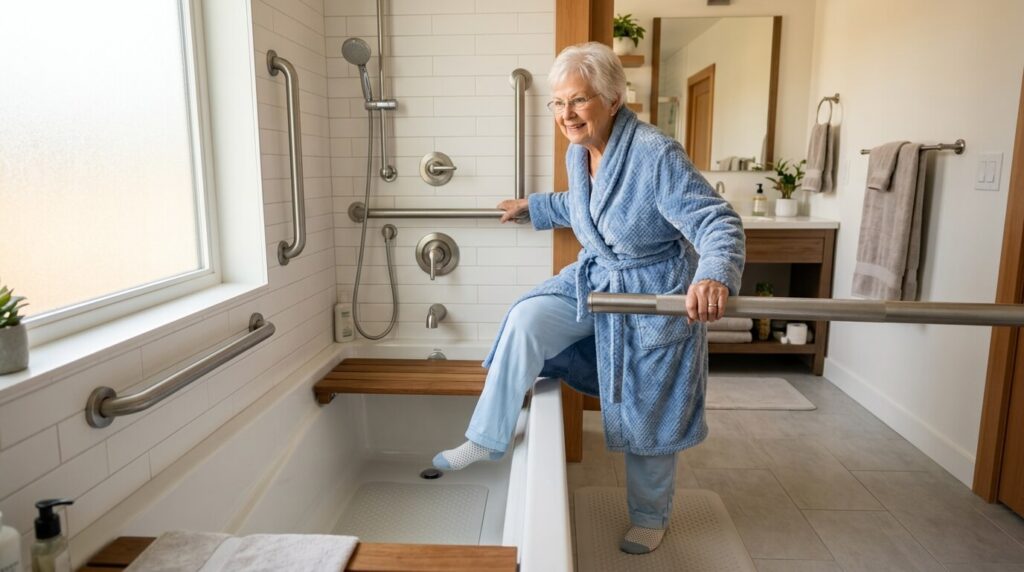
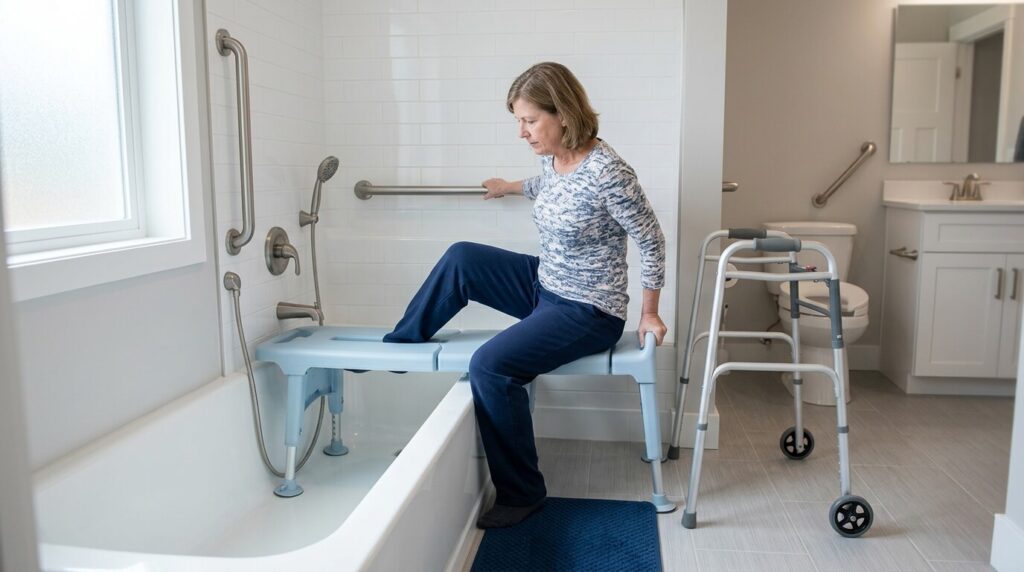
For anyone using a bath bench, transfer seat, or built-in tub seat, the movement of lowering to seated and rising back up requires a different kind of support than standing balance.
Placement: An angled or vertical bar on the back wall, positioned roughly 9 inches above seat height when a bath seat is present, or angled across the corner where the user will naturally reach during the sit-to-stand motion. ADA’s permanent-seat configuration calls for a vertical bar 18 inches minimum length at the control end specifically to support this transfer.
Quick-Reference Placement Table
| Tub Zone | Bar Orientation | Height/Position | Primary Function |
|---|---|---|---|
| Entry/exit edge | Vertical | Base at tub-wall height, extends 18–24″ up | Step-over balance |
| Long (back) wall | Horizontal | 33–36″ from tub floor | Standing/lateral stability |
| Control/faucet wall | Horizontal or angled | 33–36″ from tub floor | Reach support while adjusting controls |
| Seat/transfer zone | Angled or vertical | ~9″ above seat height | Sit-to-stand transfer |
| Outside tub (floor entry) | Vertical | Standard door/wall height for reach | Pre-entry balance point |
Grab Bar Types and When to Use Each
Horizontal Grab Bars
Best for sustained standing support and lateral stabilization. The default choice for the long wall of any tub and the most commonly installed bar type overall.
Vertical Grab Bars
Best for the entry/exit pull-up motion and for sit-to-stand transfers. Mounted at the tub entrance or near a transfer seat.
Angled (Diagonal) Grab Bars
A hybrid that supports both the standing lateral grip of a horizontal bar and the pulling leverage of a vertical bar. Many occupational therapists consider angled bars the single most versatile option for users with varying hand strength or grip ranges, since the diagonal surface gives the hand multiple comfortable grip points along its length rather than one fixed angle.
L-Shaped and Combination Bars
Increasingly common in modern installations, these combine a vertical and horizontal segment in a single fixture, reducing the number of separate anchor points needed while covering both standing and transfer support in one bar.
Foldable/Flip-Up Bars
Mount near a toilet or tub and fold flat against the wall when not in use — useful in shared bathrooms where a fixed bar might be in the way for other users, though they offer slightly less rigidity than a fixed bar.
Suction-Mounted Bars: Why Professionals Recommend Against Them
Suction grab bars are sold widely as a tool-free, rental-friendly safety option, but they carry real risk. Suction seals degrade with soap residue, mineral buildup, temperature changes, and tile texture, and most manufacturers’ own instructions recommend testing the seal regularly — an easy step to forget in daily use. Because they aren’t anchored to structural framing, a suction bar can fail at the exact moment full body weight is placed on it, which is the worst possible failure mode for a safety device. They are reasonable as a temporary travel aid (in a hotel bathroom, for example) but should not be relied on as a permanent home safety installation.
How to Find Studs and Install Grab Bars That Actually Hold
This is the part most placement guides skip — and it’s the part that determines whether a perfectly positioned bar will hold up under real weight.
Why Stud Mounting Matters
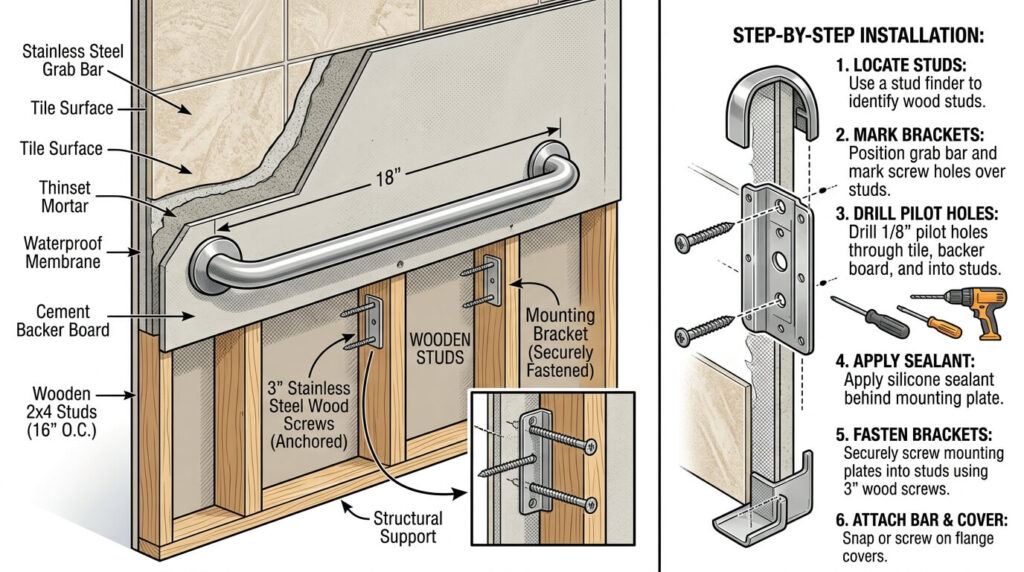
Drywall and tile alone cannot support the 250+ pounds of force a grab bar must withstand. Every code-compliant installation anchors into either wall studs or dedicated blocking (a horizontal piece of lumber installed inside the wall specifically to back a grab bar). Mounting into tile or drywall with standard anchors — even “heavy duty” wall anchors — is one of the most common and most dangerous DIY mistakes, because the bar can appear secure during a light test tug and still fail under sudden full-weight loading.
Locating Studs Behind Tile
- Use a stud finder rated for use through tile (standard magnetic stud finders often fail on tiled walls; an electronic stud finder or one designed for masonry/tile works better).
- Look for grout lines and tile seams, which can sometimes hint at framing behind standard 16-inch on-center stud spacing.
- If uncertain, drill a small pilot hole in an inconspicuous spot (inside where the bar’s mounting flange will cover it) to physically confirm stud location before committing to the final mounting holes.
- If no stud falls where the bar needs to go, install blocking — this typically requires opening the wall from the back (if accessible) or cutting an access panel from the front, then patching afterward.
When No Stud Is Available
If the ideal placement doesn’t align with a stud, there are two acceptable paths: shift the bar a few inches to land on the nearest stud (acceptable as long as it doesn’t meaningfully compromise reach), or install code-rated blocking behind the wall. What is not acceptable, for a primary safety bar, is relying on drywall anchors alone, regardless of how the packaging is marketed.
Why Bathrooms Built or Remodeled Today Often Include Blocking Even Without a Bar
Many modern remodels — and ADA’s residential exemption explicitly anticipates this — install grab-bar blocking behind tub and shower walls during construction, even if no bar is installed immediately. This “aging-in-place” approach means a bar can be added later in minutes rather than requiring wall demolition.
Materials: What Grab Bars Are Made Of and Why It Matters
| Material | Pros | Cons | Best For |
|---|---|---|---|
| Stainless steel | Highly corrosion-resistant, strongest weight ratings, low maintenance | Higher cost than aluminum or plastic | Primary safety installations, wet environments |
| Brass | Elegant finish options, corrosion-resistant | More expensive, can show water spots without sealant | Design-forward bathrooms wanting a non-institutional look |
| Aluminum | Lightweight, rust-resistant, generally affordable | Lower weight capacity than steel in some products | Budget-conscious installs where full steel load rating isn’t required |
| Plastic/composite | Inexpensive, lightweight | Not suitable for full-weight support, prone to cracking over time | Decorative or very-low-load accessory bars only, not primary safety bars |
For any bar intended to bear a person’s full weight during a fall-prevention moment, stainless steel is the standard recommendation among contractors and accessibility specialists.
Common Placement Mistakes (And How to Avoid Them)
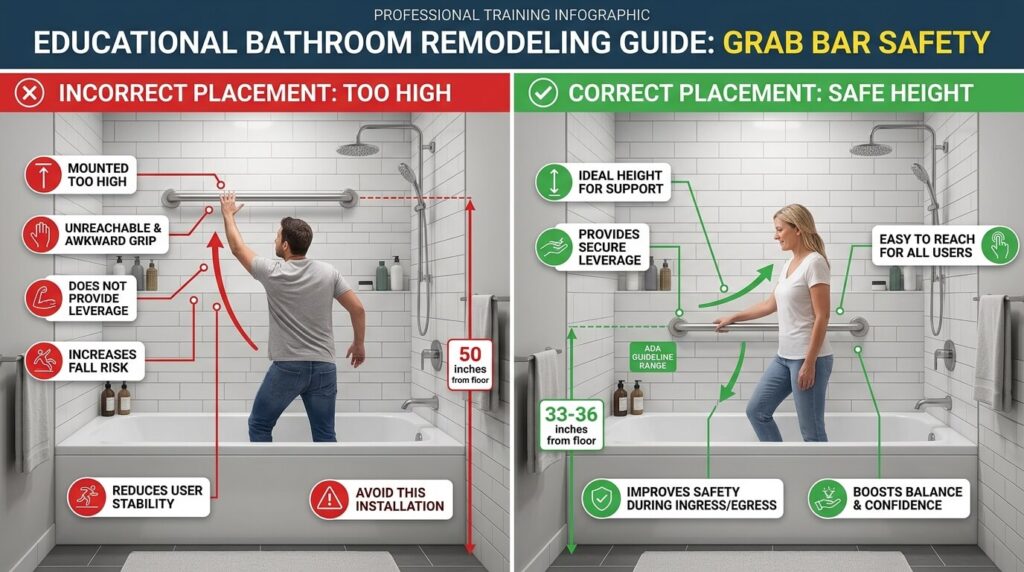
Mounting too high or too low. A bar installed outside the 33–36 inch range — often guessed rather than measured — can force an awkward reach at exactly the wrong moment. Always measure from the tub floor, not the bathroom floor, since tub walls and bathroom floors are rarely the same height.
Placing the bar where the body doesn’t naturally reach. A bar centered on a wall for visual symmetry rather than placed at the actual point of entry or transfer is a common cosmetic-over-function error. Walk through the actual motion — stepping in, standing, sitting — before marking final positions.
Skipping stud verification. Covered above, but worth repeating: this is the single most common reason grab bars fail.
Installing only one bar. A single bar rarely covers both the entry/exit motion and the standing/transfer motion. Most accessible bathrooms benefit from at least two bars covering different zones.
Ignoring the 1.5-inch wall clearance. Too little clearance prevents a full hand grip; too much creates a gap where an arm can slip through and become trapped, especially during a fall.
Choosing decorative bars rated for towels, not bodies. Many “grab bar” style towel bars sold in home decor stores are not load-rated for safety use. Confirm a weight rating (ideally 250 lbs minimum, 300+ for added margin) before purchase.
Forgetting controls and obstructions. A bar positioned directly behind a faucet handle or shower control can block access to that fixture. Map out faucet location before finalizing bar placement.
Step-by-Step: Planning Your Tub Grab Bar Installation
- Identify every transition point in the bathing routine specific to the user — entry, standing, reaching for controls, sitting, exiting.
- Mark the desired height band (33–36 inches from the tub floor) on the wall at each transition point.
- Locate studs or existing blocking behind the wall at each marked point.
- Adjust bar position slightly, if needed, to align with available framing rather than forcing a non-structural mount.
- Select bar type and length for each zone based on the table above.
- Confirm wall clearance will land at 1.5 inches once the bar is mounted.
- Check for fixture conflicts — faucets, shower valves, soap dishes — before drilling.
- Install with corrosion-resistant hardware, sealing any holes in tile or fiberglass with waterproof silicone to prevent moisture intrusion behind the wall.
- Test the installed bar with a firm, sudden pull (simulating a fall-catch motion, not just a light tug) before relying on it.
Cost Factors
Grab bar costs vary by material, length, brand, and installation method:
- Bar hardware alone typically ranges from roughly $20 for basic aluminum bars to $100+ for premium stainless steel or designer brass options.
- Professional installation adds labor cost, which varies significantly by region and whether blocking needs to be added behind the wall (a same-day mount into existing studs costs far less than an installation requiring tile removal and wall reinforcement).
- Bundled remodel installation (installing grab bars as part of a broader tub-to-shower conversion or full bath remodel) is often more cost-effective per bar than retrofitting bars into a finished bathroom one at a time, since the wall is already open.
- DIY installation saves on labor but carries the highest risk of improper stud anchoring if not done carefully — a poor trade-off given that the entire purpose of the bar is fall prevention.
Maintenance and Long-Term Care
- Wipe bars regularly to prevent soap scum and mineral buildup, which can make gripping surfaces slippery — defeating the bar’s purpose.
- Periodically check mounting hardware for any wiggle or looseness, especially in the first few months after install as anchors settle.
- Re-caulk or re-seal around the mounting flange annually, or sooner if discoloration suggests water intrusion behind the wall.
- For suction-style bars (if used temporarily), test the seal before every use rather than assuming it’s still secure.
Frequently Asked Questions
What is the correct height for a tub grab bar?
The standard, ADA-aligned height is 33 to 36 inches above the tub floor, measured to the centerline of the bar. This range works for most adult users; shorter or taller individuals, or those with specific mobility needs, may benefit from a custom height outside this band.
How many grab bars does a bathtub need?
Most accessible tub setups use at least two bars: one vertical bar at the entry/exit point and one horizontal bar along the long wall. A third bar at the control end or near a transfer seat is common for users with greater support needs.
Should tub grab bars be vertical or horizontal?
Both, ideally. Vertical bars support the pulling motion used during entry, exit, and sit-to-stand transfers. Horizontal bars support lateral balance while standing or seated. Angled bars offer a hybrid of both benefits in a single fixture.
Can grab bars be installed in a fiberglass or acrylic tub surround?
Yes, but the bar must be anchored into wall studs or blocking behind the fiberglass, not just into the surround material itself, which cannot bear safety-rated loads on its own.
Do grab bars need to be installed into wall studs?
Yes, for any bar intended to support full body weight. Drywall anchors alone are not rated for the forces involved in a fall-catch scenario. If a stud isn’t available at the ideal location, blocking should be added behind the wall.
What is the legally required weight capacity for a grab bar?
ADA standards require a minimum of 250 pounds of force resistance at any point along the bar. Many residential-grade bars exceed this, with some rated to 300–500 pounds for additional safety margin.
Are ADA grab bar guidelines required in a private home?
No. The 2010 ADA Standards exempt residential dwelling units from mandatory installation, provided walls are reinforced for future installation. However, ADA measurements are widely used as the best-practice benchmark for home installs because they’re based on extensive ergonomic research.
What’s the difference between a grab bar and an assist bar?
A true grab bar is built and rated to support a user’s full body weight during a fall or transfer. An assist bar offers some balance support but isn’t necessarily rated for full-weight loading. For bathtub safety applications, a fully rated grab bar is the appropriate choice, not a decorative assist bar.
Can I install a grab bar myself, or do I need a professional?
A confident DIYer with the right tools can install a grab bar into existing studs. However, locating studs accurately behind tile, adding blocking where no stud exists, and properly waterproofing mounting holes are all places where mistakes commonly occur. Many homeowners choose professional installation specifically because the entire point of the bar is safety, and an improperly anchored bar is a liability rather than a solution.
Where should a grab bar go for someone using a shower transfer bench across the tub?
For bench users, the priority zone shifts to the entry point and the area directly beside where the bench sits — typically a vertical or angled bar positioned to assist the sideways slide-and-pivot motion used to transfer from a wheelchair or walker onto the bench.
Do suction cup grab bars actually work?
They can provide modest, temporary support, but they are not a substitute for a stud-mounted bar. Suction seals weaken with soap film, temperature changes, and time, and most manufacturers recommend frequent seal testing — an easy step to skip, which is exactly when failure becomes dangerous.
What’s the best grab bar length for a bathtub?
Common lengths run 12, 16, 18, 24, 32, and 36 inches. A 24-inch bar is a versatile middle-ground choice for the long wall of most tubs, while shorter 12–18 inch bars work well as vertical entry-point or transfer-zone bars.
How far should a grab bar be from the wall?
ADA specifies a fixed 1.5-inch clearance between the bar and the wall — enough room for a full hand grip without creating a gap large enough for an arm to slip through and become trapped.
Should grab bar placement be different for children?
Yes. A lower-mounted bar, positioned at a height a child can comfortably reach (well below the standard 33–36 inch adult range), gives children more independence and stability without forcing them to stretch upward.